About Touring Bike Frames & Touring Bike Framesets
The frame and forks are the heart of your bike and the most important part of it. Bike frames are mostly designed for general use which doesn’t include loaded, open-road touring. What specific things should we factor into frame and fork design for a long distance bike?
Touring riders tend to spend more time on the bike so run the risk of becoming uncomfortable. A touring bike frame needs to be stiff sideways (laterally) so as not to lose energy but to be a bit springy or soft when it hits a bump.
Unlike racing cyclists, tourers don’t need high maneuverability and happily trade it in for greater steering stability. Then they don’t need to hold on as firmly and can ride comfortably for much longer.
We don’t tour to stare at the road. We want to see the world so touring cyclists prefer to sit up a bit and to have the handlebars almost as high as the seat. Being able to vary the sit-position is also good.
A touring bike is a beast of burden and needs to be prepared for carrying loads. This includes ensuring there is heel clearance from rear panniers.
You also need clearance to allow for wider tyres, should you want to fit them. With bigger tyres and front mudguards, toe clearance needs to be allowed for.
You also need to consider attaching things like multiple water bottles, a kick stand, a steering stabilizer, front and rear carriers, spare spokes, lighting systems and mudguards. Apart from frame geometry and materials these are critical to a fully integrated touring bike.
For all that is said about steel as a frame material, it is that it survives being bashed around that wins the day. Not that one expects their bike to be bashed around. But it is not rare to see a dent on a touring bike frame and had it been most other materials that would have signaled a real problem.
Touring Bike Frame Design
This is not need-to-know stuff but if you would like to go through the frame design steps, start with the wheel size, then the fork trail, the bottom bracket shell drop and take it from there. The wheel size is the subject of our separate wheels consideration page. Except for the extra small size, we are working with 700C.
Fork Trail on Touring Bikes
Fork trail is the distance that the contact point of the front wheel trails behind the steering axis (a line through the middle of the head tube), producing a caster effect.
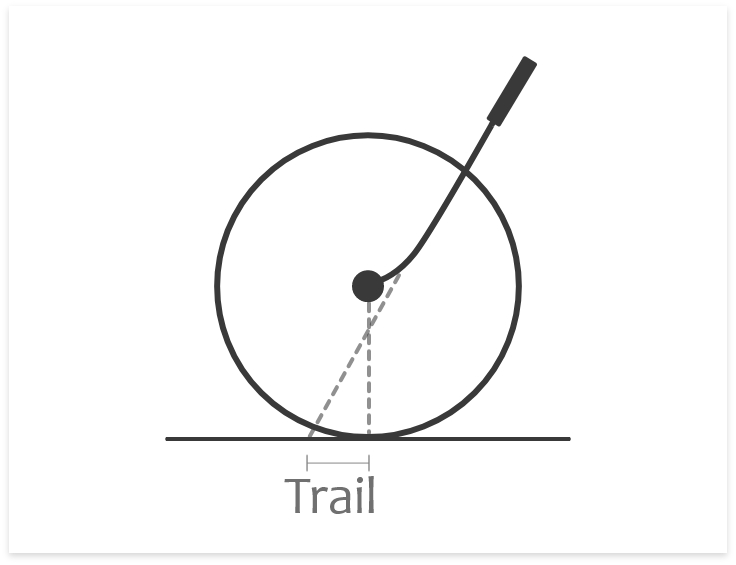
The less trail or, the closer the trail point is to the axis, the ‘twitchier’ the bike is. As the trail gets longer you have to hold on less firmly. The ‘steeper’ the head (tube) angle, the more the point projected on the ground moves back, thereby reducing the trail. The less the fork rake (the amount the fork bends forward at the bottom), the further back the tyre contact point is from that projected point. So less fork rake equates to greater trail and ‘slower’ steering making it easier to ride. In reality, it makes it possible to ride. It links the “lean angle” of the frame with the turning angle of the fork. Leaning the bike causes the fork to turn in that direction, because the frame is lower after the fork has turned.
Another issue with touring bikes is that they need to steer and behave properly when they have a front load and are going fast on long descents. The slower steering and greater stability of higher trail provides this.
Less trail will require less force to change directions and more trail will require more force. It is far easier to ride a touring bike with no hands simply because the caster effect is stronger. Touring bikes are mostly going straight ahead unlike racers who want to maneuver. In practice, race bikes have trail in the 45-60mm zone and tourers are in the 60-70mm zone.
Some makers’ sites don’t show the trail dimension so you’d need to calculate it yourself. The formula is easy to pick up. You can see a Vivente Bike’s trail data on the Bike Sizing page. Those figures are for 32C tyres and it is interesting to note that the 64mm of trail expands to 69mm if you fit a 45C tyre. Tyre (bag) size is part of the trail calculation.
Adding a steering stabilizer is possible but very rarely seen. We have been fitting most Vivente Bikes with a German Hebie stabilizer since 2017. This is an elastomer connection from the back of the fork crown to the underside of the frame downtube.
Bottom Brackets & Touring Bike Frames
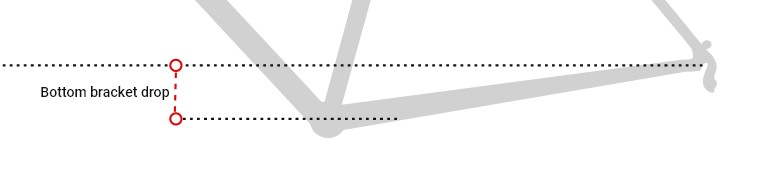
The bottom bracket shell sits at a distance below the line between the wheel axles. We call this distance the BB Drop. On cyclocross bikes and on both track and crit bikes, the drop is normally 55-65mm, on open road racing bikes 65-70mm and on touring bikes they are typically around75mm. A lower bottom bracket (greater BB drop) makes a bike easier to get on and off, your centre of gravity is lower the bike handles better. It is easier to ‘steer’ through your bum on the seat. With a lower bottom bracket in relation to the wheel centres, you feel more stable. At speed this is even greater and touring bikes are more stable (than for example cyclocross bikes) on fast descents.
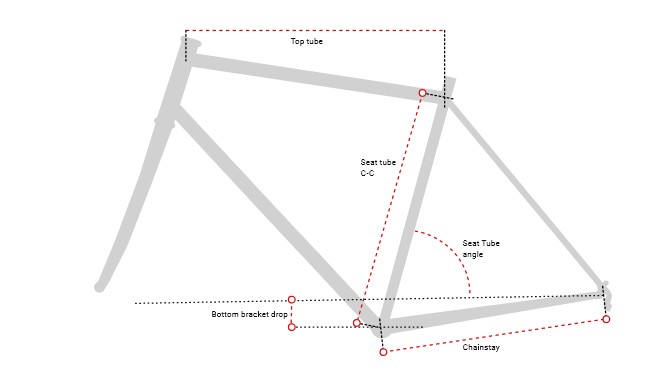
Next we position the seat by adopting a seat tube angle and length. There is nothing very special about this. On an average sized frame, 1° of variation moves the seat forward or back about 1cm. On a road racing bike the rider is a bit more ‘over’ the pedals and the seat tube may be more vertical. In the extreme cases of TT (time trial) bikes the seat angle is around 78°. Some frame makers say that touring riders don’t need efficiency so much and ‘slacker’ seat tubes down to 72° are best. Their suggestion is that there is a trade off of efficiency for comfort by being back further.
However the real issue is where the handlebars are in relation to the seat. How far? And what is their height relative to the seat? Nail down seat tube angle and length first and then select the bar position.
So is efficiency less important on touring bikes? There is a lot of physical work in touring and if locating the Knee Over the Pedal Spindle (KOPS) is more efficient, then, let us have it. Depending on frame size and crank length this leads to seat angles from 73° up to 74.5°. This puts you over the cranks rather than slightly behind them. However the differences are small and you can move the seat forward or back 2cm anyway.
Chain Stay Length in Touring Bike Frames
Next we look at the chainstay length. This is a bike that needs room for luggage. Making the stays longer is sometimes covered in a discussion about wheel base (the distance from front to rear wheel axle). Wheelbase is the sum of sections. The front sections are governed by your body size and steering choices. The lengthening of the frame happens mainly at the back end. So it’s best to talk about chainstay length and wheelbase as more of an outcome. Correct chainstay length gives you heel clearance from panniers.
In millimeters, 430 is a bit too short except on the smallest frame where riders have smaller shoes. Generally 450 is good. But many top touring frames have a kick-stand mounted near the end of the left hand chainstay so this can be hit by the heel of tall riders with large shoes unless it is at least 460.
Stack and Reach
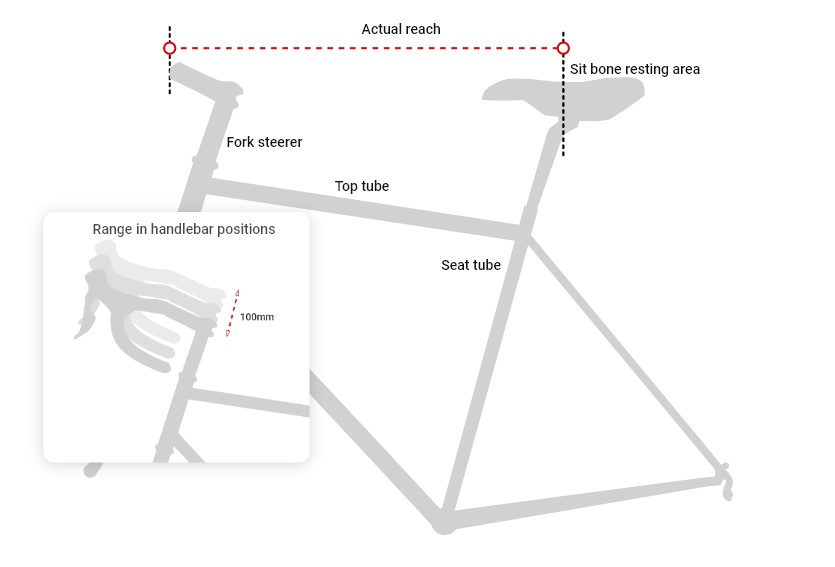
All that is left for the fundamental geometry on this frame is to locate the handlebars in relation to the seat. In the world of bike geometry discussion people talk about stack and reach as this graphic of a racing bike shows. Notice though that the stem is horizontal and it is immediately above the top of the head tube.
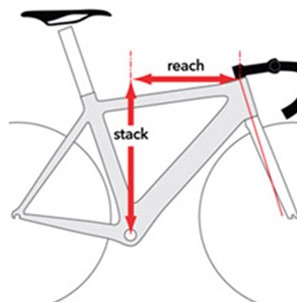
On touring bike frames the steering tubes can often extend vertically 100mm to position the stem higher. Also the handlebar stem itself is normally sloping up. The “actual reach” depends on your set-up. So an alternative approach is to start from where the sit-bones rest on the seat. Then, measure to the upper center of the handlebars. This is not just frame and fork geometry now but it is taking into account other components that govern where our hands are.
Regardless of the handlebar style, relative to the competitive cyclist, tourers tend to be sitting up with their head in a higher hand position. It is best not to achieve this just by having a super-long fork steerer and lots of spacers as there is a point where the front end of the bike is not stiff and stable enough with front panniers. On the smaller wheeled bikes (including 26”) by the time you get the bars where you want them there might be flex you would not have had on a 700C with a longer head tube. This is also why touring frames have sloping top tubes in all but the largest sizes.

Frame and Fork Materials for Touring Bikes
Steel is the material of choice. It is the most repairable material. It can be strong yet still lightweight, and it is really stiff. But it has the winning feature of not being ‘notch sensitive’. Scratches and dents? It would have to be major damage before it could lead to failure of tubes, especially of fork blades. Tubes though still need to be the correct diameter and wall thickness. These dimensions are critical. Imagine a loaded bike, with front and rear panniers and handlebar bag, whizzing down a mountain and hitting a bump. Or strongly applying disk brakes ahead of a bump. The forces are big. The solution is not overbuilding as then you lose the suppleness of the ride given by well designed forks. That’s why we recommend testing to EN standards.
In anticipation of the bike having both front and rear panniers, the downtube has thicker walls. Top tubes may have thinner walls on the smaller sizes. Not having rear rim brakes allows use of thinner walls on the seat stays. Another weight saving idea is to machine away some of the wall of the head tube as the thickness it needs at the ends is greater than what is needed for 90% of the length.
Steel is not all the same and in this zone it is actually a steel alloy that is used. The bike industry refers to it as chrome-moly or cr-mo. 4130 is by far the most common of all the steels used to build high quality bicycle frames. The 4 in 4130 represents steel containing nickel, chromium and molybdenum, as distinct from plain carbon, nickel, nickel chromium and other steels. The 1 in 4130 defines the percentage of chromium and molybdenum in the alloy. The last two numbers, 30, mean that the percentage of carbon, expressed as hundredths of a percent, is 0.30%.
Regardless of who made it, the Society of Automotive Engineers (SAE) specifies the grades of steel. If it is 4130, as used in bike frames, the composition is fixed and controlled by SAE.
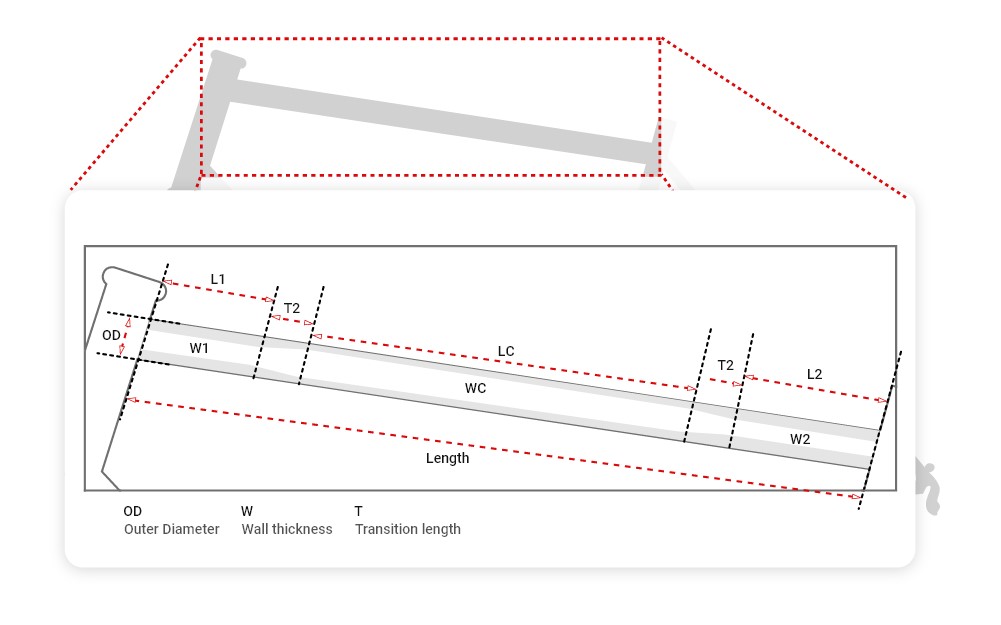
In double butted tubes, the outside diameter remains the same but the wall thickness varies over the tube’s length. This produces a lighter but still strong tube. The desired level of stiffness is given by the particular diameter and wall thickness.
What About Cyclocross Frames and Forks?
Cyclocross is a bike sport that involves riding off-road in often muddy conditions. The mud gave rise to two design features, 700x35C knobby tyres and cantilever brakes with ample clearance where the tyres pass by the brakes. There is not much mud in Australia but some of these bikes find their way there, and sometimes these are thought, because of the tyre size and brake clearance, to be suitable for touring. In some cases, the marketing departments have asked for rack mounts to be added. This further confuses people who don’t measure everything up to check.
Cyclocross bikes or frame-sets generally do not have the frame geometry you will end up preferring if you go touring. They usually have 430mm chain-stays and consequently heels would clip the panniers. You can possibly move the bags back but then you have a tail-wagging-the-dog scenario. Or you can use front bags on the back and go “lightweight” touring. They have higher bottom brackets for cornering in races so don’t have as comfortable a feel. They don’t have the thicker main-tube walls that touring bikes should have for loads. They have fork offsets akin to road racing bikes. This is good for racing but not so good for all-day riding. That “twitchiness” gets annoying, especially when contrasted to touring geometry where the bike seems to steer itself. Proper touring bikes require little effort to steer and you don’t need to hold the bars tightly.